


Dummies Guide to a 'Pro Car Wash'

Now we’ve sorted out which products and tools we’ll need, our next task is to give the vehicle a wash and possibly its first wash since it was ceramic coated. Step 1, gather all of your kit and get ready for some soapy cleaning action and that includes loading up your three buckets with ideally some warm water. Roll up your sleeves, finish that coffee and let’s get down to business.

Wheels, tyres and arches. These are the dirtiest areas on the vehicle and need to be cleaned first. There’s no point in getting the rest of the vehicle wet at this point, which would risk ‘water spotting’. Pre rinse the wheels, tyres and arches, thoroughly, to get you started.


Take your iron fallout remover and apply it straight to the wheel, then take your bottle of APC and spray that directly into the arch. Grab your first wheel cleaning brush and begin the agitation. Take your second wheel cleaning brush and continue with the agitation. I’m guessing the second brush will be used on the inner barrels and the first for the spokes.
Take your arch cleaning brush which for me is the EZ Detail Go Brush and give the arches a good scrub. Take your ‘tuff shine tyre brush’ and with a bit of APC clean the tyres side wall. You can opt to use a spare wash mitt or a microfibre towel at this point to clean the backs of the wheel spokes and also the painted inner arch lips. Rinse the wheel when complete and don’t forget to give the brake callipers some attention to.
Repeat the wheel cleaning process on all four wheels (three if you own a reliant robin or a BMW Isetta) and you can then put your wheel cleaning bucket and tools to one side. Step one for the bodywork is to give it a relatively thorough initial pressure rinse which will remove the loose bits of dirt and grime. You can start at the top of the vehicle, or the bottom, it doesn’t matter which.
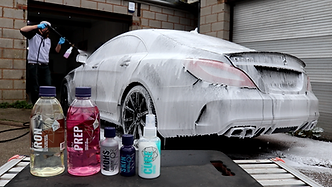

Apply a full covering of your chosen snow foam to the entire vehicle and allow it to dwell for as long as possible before it begins to dry. (Ideally a pH neutral snow foam.) If the sun did happen to come out midway through the dwelling stage, feel free to apply a second full covering. After the 5-10 minutes have passed, rinse the vehicle off incredibly thoroughly from the top down.
Add some shampoo to your wash bucket with your nice and clean wash mitt inside and give it a ‘controlled blast’ with the pressure wash to generate some suds. Grab the wash mitt and begin washing the vehicle from the top down. Be sure to rinse the mitt out thoroughly in the rinse bucket and reload with fresh shampoo from the wash bucket, which should generally be done after cleaning each panel.


Don’t use swirling motions whilst you clean the paintwork, you’ll want to adapt to a methodical straight-line approach with slight curving movements to bring the wash mitt back on itself. Only apply enough pressure to the wash mitt to keep it flat against the paintwork. Don’t scrub it forwards and backwards, as you will risk marring.
Ceramic coatings will provide you with some swirl resistance but they aren’t dummy proof. Thoroughly rinsing off the vehicle and at least one snow foaming application will make your contact wash far safer. Some clear coats are harder than others, some are scratched easier than others too, but the key really is to be careful. Make sure all cleaning implements that come into contact with the paintwork are nice and clean.
Have yourself a cheap secondary wash mitt to clean the lowest areas as there can be a lot of grime that gets built up, particularly underneath the front and rear bumpers, the side skirts, painted inner arch lips and around the exhausts. Tackle the lowest down areas with your secondary wash mitt last, to keep your primary wash mitts in their best condition.
Rinse the vehicle from the roof down and make sure to remove 99% of the shampoo suds. Grab your quick detail spray and a ‘fluffy’ microfibre drying towel and fold the towel so it’s nice and neat, which will create a nice cushion to aid in safe drying. Apply your detail spray to let’s say a ¼ or ½ of the car at a time and gently work the towel over the paint. Straight lines where possible, although you can do that curving motion to bring the towel back on itself, like what I mentioned whilst washing.
The quick detailer acts as a drying aid and it will offer a bit more lubricity to help with safe drying. It will also add a fine layer of sacrificial protection to keep your ceramic coating in its best condition. I would recommend the use of a detail spray with every wash without fail, as it’s very simple and effective to do.

Sam’s Detailing ‘Ceramic Boost’ or Gyeon ‘Wet Coat’ or even Gtechniq ‘Easy Coat’ are essentially watered-down ceramic coatings which are very easy and quick to apply and are designed to keep your main coatings hydrophobic function in check, following the cars main detail.


The key to successfully using these ceramic toppers is to make sure that the vehicles paintwork is cool, it’s still wet and you only treat a small section of the car at a time and immediately and thoroughly rinse the product back off afterwards with the pressure washer. Apply the ceramic boost to a ¼ of the car at a time, possibly even a 6th of the car and then rinse off immediately. Repeat the process until the entire car has been treated.
Ceramic coatings are incredibly water repellent when initially applied, but over the next 12 – 18 months they will gradually lose that fresh water beading affect, but only if not correctly maintained. Ceramic boost products are easy to use, when you’ve done it a couple of times. The results are outstanding on a none ceramic coated vehicle and perfect for keeping your ceramic coated car in the same condition as it was when it was freshly detailed.

If you have opted to use the ceramic boost product or one of its equivalents on this particular wash, you can now dry the vehicle as per normal with your fluffy microfibre drying towel and the detail spray.

Take a microfibre towel and with your quick detail spray mist some product onto one wheel at a time and then wipe it down. Run the towel over the tyre’s sidewall to dry it off and then go ahead and complete this process for each wheel. If you have ceramic brakes, do not allow any detail spray or any wax inhibited products onto the surface of the rotors, as it could potentially deteriorate the braking function.

Take another fresh microfibre towel and again with your quick detail spray mist the product onto the door shuts and sills and thoroughly clean them. You can opt to rinse these areas down with a pressure washer beforehand, if they are particularly dirty. Although you will need to be careful as to not turn the interior into a hot tub.

Apply your tyre dressing, clean the windows if you wish, blow out the gaps and crevices with a heated car blower (if you happen to have one) and that pretty much sums up a professional car wash, or as I like to call it, a maintenance wash.

You could now give the interior a vacuum and general clean, however, I do tend to clean the interiors first as the floor around the car will now be wet. If you head over to the Online Store you could even bag yourself a JP Details air freshener to pop inside to finish off your mini detail.

Stand back and admire your hard work (and possibly even my hard work if you had the car coated by myself) and grab yourself a fresh coffee and perhaps even a banana and spend some time admiring your pride and joy.


A few ‘don’ts’ whilst washing or cleaning a ceramic coated car would be not to use any kind of polish for any ceramic coated areas, that is if you wish for them to remain ceramic coated. You can use tar and glue remover, bug and insect remover, iron fallout remover and panel wipe on ceramic coated surfaces, without degrading the coatings’ function. But only if you haven’t been able to remove the issue first with a less powerful chemical like window cleaner or APC.
If you do need to use a tar remover on most of the vehicle, or the iron fallout remover, or possibly the panel wipe over the entire car, due to washing the car in the baking hot sunshine. (Panel wipe is great for removing water spots by the way.) Then I would highly recommend using the ceramic boost product to boost the protection once again shortly after.
In terms of keeping a vehicle swirl free after a detail the key is to reduce the amount of direct contact that you make with the paint. A deionize water filter is going to enable you to remove one of the biggest forms of contact which is the drying stage. Filtered water at 0 ppm will in fact dry naturally and because there are zero parts per million in the water, it will evaporate perfectly. That would then lead us with the one and only ‘direct contact stage’ of washing the vehicle with the wash mitt. Which is fine.
If we then go ahead and use bug and insect removers, tar and glue removers, spray waxes or detail sprays, we would be defeating the object of reducing contact. A water filter would be highly recommended for cars with incredibly soft clear coats and for the owner who doesn't mind paying out to refill the resin, every so often.

If you follow this guide then hopefully it’s turned you from a ‘dummy’ into a Pro, so hopefully you shouldn’t have any issues going forwards. Thank you for taking the time to read my third ever blog post and feel free to check out the JP Details YouTube channel for plenty of hands on and educational detailing and valeting videos.

I have been your host; JP Details - Staffordshire. I'll hopefully see you in another Blog post soon! Hit the Blog Posts button below to lead you back to all the blogs.